Thursday, June 19, 2008

Thanks a bunch - AFSS22 & Lunchtime Sketch Challenge 22

At work on Monday one of the community volunteer groups brought in newborn kits for the office. These are so appreciated, as some of the young women, to whom we provide services, have nothing for their babies. After the volunteer left, my boss called out: Margaret, I need to commission 2 cards. One for the church ladies and one for a Girl Scout who is also collecting materials for our office to distribute to families with newborns.


This is card #1 for the church ladies (as I keep calling 'em in my brain.) I knew that I wanted to participate in MaryJo's Monday Lunchtime Sketch Challenge, as well as Allison's Suggestive Sunday challenge. Allison's challenge was especially appropriate for this card: stamped flowers. What could be more nicer on a thank you card for the church ladies than flowers?


I substituted a square sentiment box at the bottom of the card front, instead of MaryJo's oval because I don't have an oval punch. (Someday Santa will bring me some Nesties?)

I stamped the flower images on 2 scraps of Basic Grey Blush paper and the stems on Basic Grey Two Scoops paper. All of the card base materials is BG Two Scoops.

This was a very easy card to put together. Thanks to Allison & MaryJo for their help in creating this thank you card.

Material: cardbase: Die Cuts with a View; designer papers: Basic Grey; stamps: Autumn Leaves; ink: Colorbox; adhesive: Pioneer mounting tape & Pop-dots; pen: American Crafts.

Thanks for looking.

Sunday, June 15, 2008

Monday Lunchtime Sketch Challenge #21

Here it is Sunday and I've finally got a card finished for MaryJo's Monday Lunchtime Sketch Challenge; one can't accuse me of being too prompt on getting these challenge cards done.

This is the second card for one of MaryJo's challenges where I've ended up with a very patriotic card. (I think the first challenge that I did for her used virtually the same papers as this card.) I'm NOT sure why I keep ending up with flags, but ..... there ya go!

I used the same Die Cuts with a View cardstock pieces on this card, that I did my last flag card. I also used a Hero Arts stamp (see the photo below for a close up view of the stamped image.)


I stamped the Lady Liberty stamp on white cardstock with black ink and embossed with clear embossing powder. I had tried initially with clear embossing ink and black powder, but the statue of Liberty image just blurred out. I was happier with this final image. I didn't think that I wanted to leave all the cardstock white, so I got out my Cut n' Dry nibs and colored. I used Antique Linen on the back of the stamped image and Old Paper for the outside edge of the stamp.

I have to take two seconds and rave about the Cut n' Dry nibs. When I first saw them at Michaels, I thought: WOW! Those are expensive little things. Since I've purchased them and started using them on a regular basis, I don't know HOW I got by without them. If you've looked at them and had the same sticker shock that I initially had, wait for a 50% off coupon and get them then. They're seriously worth every penny; even at full price.

I used the Cuttlebug Script embossing folder to emboss the red stripes on the card. I thought it gave the card a little more interest without getting too busy. (Remember: this is my simple brained weekend.)

Materials: cardstock: Die Cuts with a View; cuttlebug embossing folder; stamp: Hero Arts; ink: Colorbox (black), Ranger (Antique Linen, Old Paper); clear embossing powder: Stampendous; flowers: Primas; brad: Making Memories; adhesives: Tombow's Mono-Multi, Pioneer mounting tape, 3M mounting foam squares.

As always, thanks again for looking.

WSC #52 - Boo!

Once again it's Sunday and time to post my card for Beate's Weekend Sketch Challenge, before the thunderstorms arrive and keep me offline.


I thought this was a fun sketch and I liked the examples that were presented using this design. I especially liked those cards which kept it simple. I think I'm in a simple mood this weekend.

But I didn't want the card to be too plain, so as well as using the 2 designer papers and the main stamped image, I decided that I wanted to try some tone-on-tone on this card.

I stamped the BOO! on the black cardstock with clear embossing ink and embossed with clear embossing powder. The flash on the camera REALLY made the embossing SHINE! It's really more subtle in real life.

Materials: cardbase: Georgia Pacific cardstock; black & purple cardstocks, orange designer paper: Die Cuts with a View; purple designer paper: Karen Foster; purple ink: Colorbox; clear embossing ink: Ranger; clear embossing powder: Stampendous; Happy Halloween stamp: All Night Media; BOO! stamp: Rubber Stampede; brad: Around the Block; adhesives: Pioneer mounting tape.

Thanks for looking.

Monday, June 9, 2008

WSC #51

A last minute post before I head off to work with a card for Beate's Weekend Sketch challenge.

Someone commented on one of my card's this weekend that summer had only just gotten here and it was too early to start on making cards for the fall.

I thought, that in keeping with a more summery theme, that I would use some Pebbles Inc. papers that I got a couple of years ago. I think that I've only used these papers once before and it was fun to pull them out for this card.


The stamping on this card is on the yellow "summer" block; one stamp from one of the Hero Arts seasons stamp sets. This was a good challenge for me, since I don't think I've ever used this particular stamp on any project. So, I used older paper from stash and an older neglected stamp. Thanks, Beate.

Materials: cardstock: Georgia Pacific (white card base), stash (green mat); designer paper, starfish die cut: Pebbles, Inc.; stamp: Hero Arts; ink: Versacolor.

Thanks for looking.

Sunday, June 8, 2008

Lunchtime Sketch challenge #20

At Mary Jo's Technostamper blog there's a challenge posted every Monday. And today is Sunday and I've finally got that challenge card done.


I'd heard about ladies "suffering" from insomnia during menopause; I can personally say now that at least it's a good time to make cards.


This card, also, uses the new Bo Bunny designer paper that I found last weekend at Picture in Time Scrapbooks in Port Saint Lucie, FL. I'm rather surprised at myself; I was never a pink and white kind of girl. And I'm not normally a pink and white kind of woman. But this paper has been fun to play with.

Materials: cardstock: Georgia Pacific; designer paper: BoBunny; stamp: thanks (Hero Arts); ink: red (Colorbox), light rose shadow ink (Hero Arts); ribbon: craft supply; adhesive: Pioneer mounting tape and pop-dots.

Thanks for looking.

AFSS20 - late entry

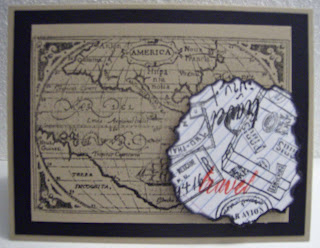
Okay, so Allison posted this Burn, baby, burn challenge. And I don't do matches; why, you ask? I dunno. It might be because I'm a Pisces and avoid matches like a plague. Maybe it's 'cause my daughter had an apartment fire in 2006 and lost almost everything she and her family had. So, when I first saw the challenge, I knew: NO matches for me.

So I found a Photoshop tutorial on how to create burnt edges on a project. And I created a little piece of paper with burnt edges. (I couldn't actually complete part of the tutorial; something you can do in full Photoshop, that isn't available in PSE.)

Then I contemplated my "burnt" piece of paper for several days, wondering WHAT I was going to do with this "thing". My inspiration led me back to travel themes and yet ANOTHER travel card. Gee, I've been back from Romania for 2 weeks; don't you think I'd get over it?!?

The "piece" of paper is actually from a download of "paper" from Shimelle's website. After "burning" the edges, I stamped various travel themed stamps on the paper. Since it looked boring all in black and white, I colored with a red marker the word travel on one of the stamps to provide SOME interest on this card. After that the rest of the card came together easily for me.

(BTW, this was the first time that I had actually colored on a stamp with a marker; I know that makes me horribly retarded; and it really was easy!!)

Materials used: cardstock: stash/unknown sources; paper: white printer paper; ink: Colorbox; marker: Marvy Uchida; stamps: Par Avion & republique mexicaine (Hero Arts); suitcase & world map (Inkadinkadoo); travel word (Limited Edition); adhesive: Pioneer mounting tape & pop dots.

Lastly: sorry about the poor photo. I didn't want to dig out the digital SLR, so I just used the digital point and shoot; quality will tell.

As always thanks for looking.


Friday, June 6, 2008

thankful for....

I first learned about the Sheetload of Cards site at Flossie's blog. Thanks, Flo.

But this is the first time that I've tried one of their sketches. I must confess that I didn't make 10 cards this time. I used some scraps that I've had for my first attempt. This month's sketch can be found here.

As well as providing the sketch for this month's card, the challenge was issued to use some of the $1 stamps we've all bought at the craft stores. This challenge particularly hit home, since I'd JUST bought some new Studio G stamps this week!!

So for this challenge & sketch I used a little stamp from a new Studio G set for the month of November: "I am thankful for U."

Materials: cardstock: Bazzill (brown), unknown source (cream); designer paper: Basic Grey (Mellow); stamp: Studio G; inks: Ranger, distress ink & sepia archival ink; die cut letter: Sizzix; flowers: Prima; brads: Making Memories; adhesives: Xyron, Pioneer mounting tape, Tombow Mono Multi.

This was a fun sketch design to play with and I'm glad to start making cards for the fall. Too often I wait until the last minute to make my cards for Thanksgiving and Christmas. I'm looking forward to all the great sketch designs, which will have my card cupboard filled up well ahead of time.

Thanks for looking.

Sunday, June 1, 2008

WSC #50 -- Thinking of you

I haven't had the chance for a few weeks to participate in Beate's Weekend Sketch challenges. So I was excited that we didn't have any major plans for the weekend and that I might have some crafting time.

I've been trying to be a frugal crafter of late, using mostly my stash for creative materials. But there was a sale this weekend at the little scrapbook store in Port Saint Lucie, FL (just down the road from where I live) and I had to go in and support them. During this visit I found the fun designer paper that I used in today's card.

I had had every intention of following Beate's design to the letter (so to speak), but when I got to stamping my sentiment on the one panel on this card, it just didn't fit!!! So everything literally got turned on the side at the last minute. But I like the final card; the colors are NOT my norm, but it's good to get outside of the mono-tone box once in awhile?!?

Materials: white cardstock: Georgia Pacific; pink cardstock: Bazzill; designer paper: Bo Bunny; stamps: Studio G; ink: Colorbox; white grosgrain ribbon: Michaels; adhesive: Pioneer mounting tape.

Thanks for looking.